Category Archives: General - Page 2

WP7: Notify user of new Application Version

UPDATE 7 NOV 2011: Have a look at this post: WP7: Northern Lights WP7 Toolkit v0.0.1 for the latest version of this code example.

Inspired by the great talk of Jeff Wilcox on TechEd Australia (video here) I dediced to implement a Application Version checker for my application before I publish my first version to the marketplace.

Jeff Wilcox is the maker of 4Th & Mayor, a successful Windows Phone 7 application. In his talk on TechEd Australia he mentioned some tips&tricks for future application developers. One of those tips is to build a version checker in your app so you can notify the users when there is a new version available for your app.

He has a lot of users that are running an old version of his app and he has no way to reach out to them and inform them that there is a new version with a lot of new features.

The following code should solve this problem.

I implemented the AppVersionManager class which gets the latest version number from a text-file online and compares this with the version number stored in your WMAppManifest.xml.

AppVersionManager.c

namespace MyApp.Utils
{
    using System;
    using System.ComponentModel;
    using System.Diagnostics;
    using System.IO;
    using System.Net;
    using System.Threading;

    /// 
    /// AppVersionManager class.
    /// 
    public class AppVersionManager
    {
        #region Fields
        private static string uri = "http://www.myapp.com/data/appversion.txt";
        #endregion

        #region Public methods
        /// 
        /// Check for new version of app and execute action when new version is available.
        /// 
        /// The action to execute when there is a new version available.
        public static void CheckForNewVersion(Action action)
        {
            BackgroundWorker bgw = new BackgroundWorker();
            bgw.DoWork += (sender, e) =>
            {
                Version appVersion = GetVersion();

                DoWebRequest(AppVersionManager.uri, appVersion, action);
            };

            bgw.RunWorkerAsync();
        }
        #endregion

        #region Private methods
        private static Version GetVersion()
        {
            string version = StateManager.Get("AppVersion");

            if (string.IsNullOrEmpty(version))
            {
                version = Utils.General.GetVersion();
                StateManager.Set("AppVersion", version);
            }

            try
            {
                return new Version(version);
            }
            catch
            {
            }

            return default(Version);
        }

        private static void DoWebRequest(string uri, Version appVersion, Action action)
        {
            string id = "appversionrequest";

            if (action == null)
            {
              return;
            }

            Timer t = null;
            int timeout = 60; // in seconds

            try
            {
                HttpWebRequest request = (HttpWebRequest)WebRequest.Create(uri);
                request.Accept = "*/*";
                request.AllowAutoRedirect = true;
                
                // disable caching.
                request.Headers["Cache-Control"] = "no-cache";
                request.Headers["Pragma"] = "no-cache";

                t = new Timer(
                    state =>
                    {
                        if (string.Compare(state.ToString(), id, StringComparison.InvariantCultureIgnoreCase) == 0)
                        {
                            Debug.WriteLine(string.Format("Timeout reached for connection [{0}], aborting download.", id));

                            request.Abort();
                            t.Dispose();
                        }
                    },
                    id,
                    timeout * 1000,
                    0);

                request.BeginGetResponse(
                    r =>
                    {
                        try
                        {
                            if (t != null)
                            {
                                t.Dispose();
                            }

                            var httpRequest = (HttpWebRequest)r.AsyncState;
                            var httpResponse = (HttpWebResponse)httpRequest.EndGetResponse(r);

                            if (httpResponse.StatusCode == HttpStatusCode.OK)
                            {
                                using (StreamReader reader = new StreamReader(httpResponse.GetResponseStream()))
                                {
                                    string response = reader.ReadToEnd();

                                    try
                                    {
                                        Version currentVersion = new Version(response);

                                        if (appVersion < currentVersion)
                                        {
                                            action();
                                        }
                                    }
                                    catch
                                    {
                                    }
                                }
                            }
                            else
                            {
                                Debug.WriteLine(string.Format("Error occured accessing endpoint: {0} [{1}]", httpResponse.StatusCode, uri));
                            }
                        }
                        catch
                        {
                            Debug.WriteLine(string.Format("Error occured accessing endpoint: [{0}]", uri));
                        }
                    },
                    request);
            }
            catch
            {
            }
        }

        #endregion
    }
}

the Utils.General.GetVersion() implementation

        public static string GetVersion()
        {
            Uri manifest = new Uri("WMAppManifest.xml", UriKind.Relative);
            var si = Application.GetResourceStream(manifest);
            if (si != null)
            {
                using (StreamReader sr = new StreamReader(si.Stream))
                {
                    bool haveApp = false;
                    while (!sr.EndOfStream)
                    {
                        string line = sr.ReadLine();
                        if (!haveApp)
                        {
                            int i = line.IndexOf("AppPlatformVersion=\"", StringComparison.InvariantCulture);
                            if (i >= 0)
                            {
                                haveApp = true;
                                line = line.Substring(i + 20);
                                int z = line.IndexOf("\"");
                                if (z >= 0)
                                {
                                    // if you're interested in the app plat version at all                      
                                    // AppPlatformVersion = line.Substring(0, z);                    
                                }
                            }
                        }

                        int y = line.IndexOf("Version=\"", StringComparison.InvariantCulture);
                        if (y >= 0)
                        {
                            int z = line.IndexOf("\"", y + 9, StringComparison.InvariantCulture);
                            if (z >= 0)
                            {
                                // We have the version, no need to read on.                    
                                return line.Substring(y + 9, z - y - 9);
                            }
                        }
                    }
                }
            }

            return "Unknown";
        }

The contents of the appversion.txt file

1.1.0.0

So know you can call AppVersionManager from your MainPage.xaml to check for a new version and execute whatever you want to notify the user of your new version of the application.

            AppVersionManager.CheckForNewVersion(() =>
            {
                // notify user of new version.
            });

Probably the best way is to show a popup and ask the user if he wants to upgrade and then navigate him to the MarketPlace.

Alright, that's all. I hope you like it! Feedback is welcome.

UPDATE: added 'if (action == null)' in the top of DoWebRequest method to skip webrequest when there is no action specified. Thanks to @peSHIr.
WP7: How to add an EULA page to your application

I’m busy working on a Windows Phone 7 Application and ran into the problem that I want to show the user an End User License Agreement (EULA) or Disclaimer page on start-up.

I want the disclaimer to show up before the MainPage is loaded and when accepted, will redirect the user to the MainPage and makes sure that the user is not able to navigate back to the disclaimer.

Here is the solution I came up with

First our supporting class, the DisclaimerManager.cs Singleton. It uses the IsolatedStorage to check if the user already accepted the disclaimer or not. When the user accepts the disclaimer a file is created in the IsolatedStorage. The IsAccepted boolean lets you know if the user already accepted the disclaimer.

using System;
using System.Net;
using System.Windows;
using System.Windows.Controls;
using System.Windows.Documents;
using System.Windows.Ink;
using System.Windows.Input;
using System.Windows.Media;
using System.Windows.Media.Animation;
using System.Windows.Shapes;
using System.IO.IsolatedStorage;
using System.IO;

namespace Classes
{
    public class DisclaimerManager
    {
        #region Fields
        private static readonly DisclaimerManager instance = new DisclaimerManager();
        private const string directory = "disclaimer";
        private const string filename = "shown.txt";
        #endregion

        #region Constructor
        static DisclaimerManager()
        {
        }

        private DisclaimerManager()
        {
            this.Check();
        }
        #endregion

        #region Properties
        public static DisclaimerManager Instance
        {
            get
            {
                return DisclaimerManager.instance;
            }
        }

        public bool IsAccepted { get; private set; }
        #endregion

        #region Private methods
        private void Check()
        {
            IsolatedStorageFile storage = IsolatedStorageFile.GetUserStoreForApplication();

            string path = string.Format(@"{0}\{1}", DisclaimerManager.directory, DisclaimerManager.filename);

            if (storage.FileExists(path))
            {
                this.IsAccepted = true;
            }
        }

        public void Accept()
        {
            IsolatedStorageFile storage = IsolatedStorageFile.GetUserStoreForApplication();

            string path = string.Format(@"{0}\{1}", DisclaimerManager.directory, DisclaimerManager.filename);

            if (!storage.DirectoryExists(DisclaimerManager.directory))
            {
                storage.CreateDirectory(DisclaimerManager.directory);
            }

            if (!storage.FileExists(path))
            {
                string value = "true";

                using (IsolatedStorageFileStream storageFile = storage.CreateFile(path))
                {
                    StreamWriter sw = new StreamWriter(storageFile);
                    sw.Write(value);
                    sw.Close();
                }

                this.IsAccepted = true;
            }
        }
        #endregion
    }
}

Then we need to update App.xaml.cs to make sure the Disclaimer Page is shown before the MainPage is loaded. We do this by attaching an event handler to the Navigating event of the RootFrame.

In App.xaml.cs, in the InitializePhoneApplication() method, after the RootFrame is initialized, add the following:

RootFrame.Navigating += this.RootFrame_Navigating;

Now we implement the event handler. It will check if the Disclaimer is accepted. If not, the DisclaimerPage is loaded. The event handler will detach itself, making sure it will not be called on further navigation in the app.

        private void RootFrame_Navigating(object sender, NavigatingCancelEventArgs e)
        {
            if (!DisclaimerManager.Instance.IsAccepted)
            {
                e.Cancel = true;

                RootFrame.Dispatcher.BeginInvoke(() =>
                    {
                        RootFrame.Navigate(new Uri("/Pages/DisclaimerPage.xaml", UriKind.Relative));
                    }
                );
            }

            RootFrame.Navigating -= this.RootFrame_Navigating;
        }

The DisclaimerPage.xaml


The Disclaimer.xaml.cs, It will navigate to the MainPage if the user accepts the Disclaimer.

using System;
using System.Collections.Generic;
using System.Linq;
using System.Net;
using System.Windows;
using System.Windows.Controls;
using System.Windows.Documents;
using System.Windows.Input;
using System.Windows.Media;
using System.Windows.Media.Animation;
using System.Windows.Shapes;
using Microsoft.Phone.Controls;
using Microsoft.Phone.Shell;

namespace Pages
{
    public partial class DisclaimerPage : PhoneApplicationPage
    {
        public DisclaimerPage()
        {
            InitializeComponent();
        }

        private void ApplicationBarIconButtonClick(object sender, EventArgs e)
        {
            ApplicationBarIconButton button = sender as ApplicationBarIconButton;

            if (button != null)
            {
                if (string.Compare(button.Text, "accept", StringComparison.InvariantCultureIgnoreCase) == 0)
                {
                    DisclaimerManager.Instance.Accept();
                    this.NavigationService.Navigate(new Uri("/MainPage.xaml", UriKind.Relative));
                }
            }
        }
    }
}

Now we need to add code in the MainPage.xaml.cs to make sure the user will quit the application when navigating back, instead of getting back to the Disclaimer. Therefore we overwrite the OnNavigated method with the following code:

        protected override void OnNavigatedTo(System.Windows.Navigation.NavigationEventArgs e)
        {
            if (this.NavigationService.BackStack.Count() == 1)
            {
                try
                {
                    var a = this.NavigationService.BackStack.ElementAt(0);

                    if (a.Source.ToString().Contains("/Pages/DisclaimerPage.xaml") == true)
                    {
                        this.NavigationService.RemoveBackEntry();
                    }
                }
                catch (Exception ex)
                {
                    ex.PrintDebug();
                }
            }

            base.OnNavigatedTo(e);
        }

The count of the BackStack should be one, we are just arriving from the DisclaimerPage. We will check if the previous page is actual the DisclaimerPage and then remove this page from the stack. Note that in this case our DisclaimerPage.xaml is located in the Pages folder!

That’s all! Hope you like it!

References:
This post, Redirecting an initial navigation, by Peter Torr helped me create this solution.

WCF RIA gzip compression of response

I was trying to enable gzip compression of my WCF RIA traffic to decrease the amount of data that is send between the client and server and improve performance.

Note: I used Fiddler2 to determine if the responses were actually compressed or not.

There is a lot of Q&A about this topic on the web, but nobody had a straight solution for me. Some posts refered to old versions of IIS or used 3rd party modules.

I was looking for a solution that will work from with IIS7.5 without installing any 3rd party modules.

Here is how I made it work.

Lets first install the necessary modules: the Dynamic and Static Content Compression modules:

How-to enable GZIP compression for normal traffic:
On Windows 7:
“Start->Control Panel->Programs and features” and click on “Turn Windows features on or off”.
Then enable:
“Dynamic Content Compression” and “Static Content Compression” in “Internet Information Services->World Wide Webservices->Performance Features” and press “Ok”.

Now your ‘normal’ HTTP responses are automatically compressed, but your WCF RIA traffic is not.

To enable this we will need to add the mime-type of our WCF RIA traffic to the list of mime-types that need to be compressed. On my system the mime-type for my WCF RIA traffic is application/msbin1. I assume this is the same for everybody.

How-to enable GZIP compression for WCF RIA Services traffic:
Open a command box (cmd.exe)
Navigate to C:\Windows\system32\Inetsrv\ and execute the following command to add the application/msbin1 mime-type to the list of types that needs to be compressed:

appcmd.exe set config -section:system.webServer/httpCompression /+”dynamicTypes.[mimeType=’application/msbin1′,enabled=’True’]” /commit:apphost

This will add an entry into the Windows\System32\Inetsrv\Config\applicationHost.config file.

Now restart your IIS server and compression is enabled for the WCF RIA Services.

Before:

HTTP/1.1 200 OK
Cache-Control: no-cache
Pragma: no-cache
Content-Length: 583
Content-Type: application/msbin1
Expires: -1
Server: Microsoft-IIS/7.5
X-AspNet-Version: 4.0.30319
X-Powered-By: ASP.NET
Date: Thu, 11 Aug 2011 17:47:10 GMT

After:

HTTP/1.1 200 OK
Cache-Control: no-cache
Pragma: no-cache
Content-Type: application/msbin1
Content-Encoding: gzip
Expires: -1
Vary: Accept-Encoding
Server: Microsoft-IIS/7.5
X-AspNet-Version: 4.0.30319
X-Powered-By: ASP.NET
Date: Thu, 11 Aug 2011 17:48:01 GMT
Content-Length: 336

I hope this post was helpful!

Useful link: http://www.iis.net/ConfigReference/system.webServer/httpCompression

WP7: PhoneApplicationService.Current.State made easy

UPDATE 7 NOV 2011: Have a look at this post: WP7: Northern Lights WP7 Toolkit v0.0.1 for the latest version of this code example.

I was reading “Programming Windows Phone 7”, a free Microsoft book (as PDF) from Charles Petzold and came across some code on why and how to access the PhoneApplicationService.Current.State (chapter 6, “Page State” paragraph) and thought about writing the following code to improve the usability.
Hope you like it:

    public class StateManager
    {
        private static PhoneApplicationService appService = PhoneApplicationService.Current;

        public static void Set<T>(string name, T value)
        {
            appService.State[name] = value;
        }

        public static T Get<T>(string name)
        {
            T result = default(T);

            if (appService.State.ContainsKey(name))
            {
                result = (T)appService.State[name];
            }

            return result;
        }
    }

It can then be invoked as follows:

Set a value

StateManager.Set<MyObject>("MyApplicationObject", obj);

Get a value

MyObject obj = StateManager.Get<MyObject>("MyApplicationObject");

Hope you like it.

ArcSDE 10: DBMS table not found [*********][STATE_ID=0]

I recently bumped into a problem when moving my development ArcSDE Geodatabase to another machine. The ArcSDE Geodatabase is running on MS SQL Standard* and is using schema’s to store data for different projects.

After restoring the database on the new machine and trying to access it in ArcCatalog I got the following error message:

DBMS table not found [*********][STATE_ID=0]

This lead me to ArcGIS bug report NIM059178 / Article ID: 38048.

Which has a patch attached, but this patch only solved the connectivity within ArcCatalog and didn’t solve the problem when accessing the ArcSDE from my Python scripts (through the ArcGIS REST Services).

After some digging around I discovered that I didn’t install ArcSDE Service Pack 1 yet. Bug NIM059178 is also part of this Service Pack. Shame on me!

I also took the opportunity to install ArcSDE Service Pack 2, but this SP isn’t necessary to solve this specific issue.

All the different ArcGIS packages (Desktop, Services, etc) have a copy of SP1 and SP2 available and as always, it’s wise to update. You can use Patch Finder to check which version you are currently running – available at the bottom of this link.

I hope this post is helpful for somebody that is encountering the same issue..

*) You need MS SQL Standard or better to use Schemas with ArcSDE Geodatabase. MS SQL Express doesn’t support this with ArcSDE.

Tips & Tricks: Remote Desktop (Terminal) Services on Windows 7

This article describes how to setup the “Remote Desktop Services” – in the past also known as Terminal Services – on Windows 7 using the Microsoft Management Console.

First you need to install the following package:
Remote Server Administration Tools for Windows 7 with Service Pack 1 (SP1)

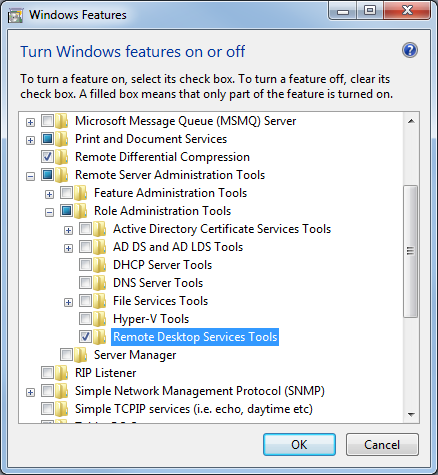
After installation, navigate to “Control Panel”-“Program and Features” and click on “Turn Windows features on or off”.

Enable “Remote Desktop Services Tools” under “Remote Server Administration Tools”-“Role Administration Tools”.

Role Administration Tools in 'Windows features'

Now you can access the Remote Desktop service through the Microsoft Management Console.

The Microsoft Management Console can be accessed by executing “mmc” in the “Start”-“Run” window.

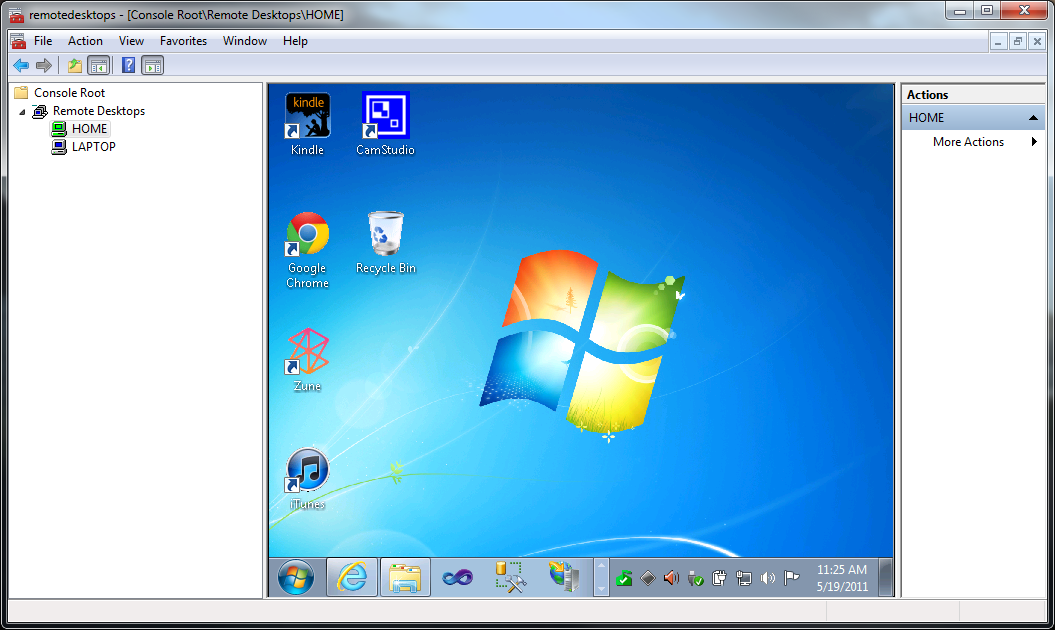
Go to “File-Add/Remove Snap-in” and Add the “Remote Desktops” snap-in. Now save your MMC configuration settings to the Desktop or any other easy accessible location and your are set.

You can add as many Remote desktops as you want:

MMC screenshot

My experience is that you can get the most out of it by saving your credentials for each connection. This way you can easily connect with each machine and make switching from one machine to another look seamlessly easy and smooth, even when you didn’t log-in yet.

On certain machines saving of credentials is forbidden. You can change this by editing the Group Policies.

Start the Group Policy Editor by running “gpedit.msc”.
Navigate to “Computer Configuration”-“Administrative Templates”-“System”-“Credentials Delegation” and open “Allow Saved Credentials with NTLM-only Server Authentication”.

Enable the policy and click on the Show button to add the machines you want to enable saving of credentials for.

‘TERMSRV/*’ will allow it for any machine (through terminal services). But you can also specify a specific domain, for instance ‘TERMSRV/*.mydomain.com’.

Close the screens by clicking “Ok” and you are done!

Happy remote administrating!

Thanks to Alin Constantin for his blog post on how to enable saving of credentials for terminal services.

Tips & Tricks: Listening to Dependency Property change notifications of a given Element

Hi,

I want to share this great post from Anoop that shows a easy way to add a notification system to dependency properties of a given element. It creates and attaches a new property to the existing property and let’s you specify the PropertyChangedCallback eventhandler.

There are different examples on the internet, but i like how Anoop created a generic method with access to the callback event handler.

Here is the main part of the code:

        /// Listen for change of the dependency property
        public void RegisterForNotification(string propertyName, FrameworkElement element, PropertyChangedCallback callback)
        {
            //Bind to a depedency property
            Binding b = new Binding(propertyName) { Source = element };
            var prop = System.Windows.DependencyProperty.RegisterAttached(
                "ListenAttached"+propertyName,
                typeof(object),
                typeof(UserControl),
                new System.Windows.PropertyMetadata(callback));

            element.SetBinding(prop, b);
        }

And here is an example on how to use it:

//Shows a message box when the text of the Textbox changes.
RegisterForNotification
	("Text", this.txtMain,(d,e)=>MessageBox.Show("Text changed"));

Read Anoop’s complete article for more information!

update (07/28/2011):
here is small update of the code so it also works with other objects instead of just FrameworkElements

        private void RegisterForNotification(string propertyName, object source, PropertyChangedCallback callback)
        {
            Binding b = new Binding(propertyName);
            b.Source = source;

            DependencyProperty prop = System.Windows.DependencyProperty.RegisterAttached(
                "ListenAttached" + propertyName,
                typeof(object),
                this.GetType(),
                new System.Windows.PropertyMetadata(callback));

            BindingOperations.SetBinding(this, prop, b);
        }

Tips & Tricks: FieldExists for ArcGIS 10 Python

Here is a way to check if a Field in a feature class already exists or not. I was looking for an existing ArcGIS Esri function / tool but couldn’t find one so I wrote my own.

def FieldExist(featureclass, fieldname):
    fieldList = arcpy.ListFields(featureclass, fieldname)

    fieldCount = len(fieldList)

    if (fieldCount == 1):
        return True
    else:
        return False

This is a function and it assumes you have already set the workspace environment.

Usage:

        if (not FieldExist(myFeatureClass, "myField")):
          arcpy.AddError("Field 'myField' does not exist in " + myFeatureClass)
          sys.exit()

hope this is helpful.

Tips & Tricks: Extending your Entity Framework classes

There are different reasons why you would like to extend the existing properties on your entity framework classes, for instance when you want to add data validation attributes or the display attribute, commonly used in ASP.Net MVC to set the ‘display’ name of the property.

Here is how to do it without editing your auto generated Entity Framework (.edmx) file. ‘author’ is the entity framework class.

    [MetadataType(typeof(authorMetadata))]
    public partial class author
    {
    }

    public class authorMetadata
    {
        [Display(Name = "First name")]
        public string firstname { get; set; }
    }

We further extend the original author class by adding another partial class and specify which class contains the metadata for the class using the Metadatatype attribute.

Windows Phone and the WriteableBitMapEx

I was investigating the use of the WriteableBitmap class and came across a great extension pack WriteableBitMapEx.

This also pointed me to a great demo written by Bill Reiss, explaining Blitting and Blending of images with the WriteableBitmap class. His original example was written in Silverlight and I was interested to see how easy it would be to port it to the Windows Phone and see how the performance would be.

Well it was really easy! I didn’t need to rewrite any code and hadn’t any problems with performance (in the emulator – Sadly enough i don’t have an actual Windows Phone yet)!

Here is the result:

Particle Windows Phone demo from Bjorn Kuiper on Vimeo.

Try it out yourself, here is the sourcecode of the Windows Phone solution:

Download the sourcecode.

Windows Phone development made easy! I love it that I don’t need to learn a new programming language to make my own phone apps!